Tuesday 18 October 2011

Light: Project - Available light

Exercise: outdoors at night.

Aim: The aim of this exercise is to explore the variety of lighting effects and colour in artificial light.

Approach and results:

For this exercise I had a number of places and buildings in mind.  Setting up the camera for the different types of shot was important.  Despite being all night shots, the desired results needed particular settings.  Tripod mounted shots did not need a high ISO whereas handheld and long focal length  invariably did unless it was very bright. I used centre or spot metering for specific subjects like buildings and evaluative for the more general shots where the whole scene was important.  A camera does not recognise when you want atmosphere so it was necessary to compensate for some of the overly bright images in order to get the end result.

I tried a number of times to get an indoor shot of a large space with lots of people but this restricts you to shopping centres and the security was rather sharp.  I'll try again sometime with a smaller camera.

This first shot is of the top of a local office building called the pyramid.  I wanted to isolate the building from it's surroundings so I waited for a clear night with no cloud cover or light pollution.  I used tungsten WB to keep the colours cool.  The green especially would turn more yellow with daylight balance.
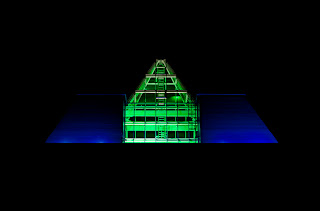
I sec ISO200 tripod
The following two identical shots of the Pantheon in Paris show the difference between black & white and colour.  The black & white has much more even tones as there is no difference in the lighting whereas the colour shot shows the yellow from the street lamps lighting the lower part of the building, the white floodlight lighting the roof and dome and the blue/white light of the moon.  I like the colour contrast of the artificial lighting against the moonlight which is lost in the B&W shot.

I/8 sec ISO800 handheld

I/8 sec ISO800 handheld
The main aim for this next shot was to ensure I exposed for the lights and not the building.  Neon lights like these are easily overexposed.  Because of the close crop there was enough light to hand hold at a reasonably low ISO.

I/125 sec ISO400 handheld
This shot is of Vidal Sasson after it closed (I didn't want any people in it).  I took it because of the arrangement of the bottles in the window.  It reminds me of a Damien Hurst installation that I saw many years ago that was the interior of a chemist shop with lots of white bottles lined up; an almost clinical quality.  The lights are quite dim as some of the shop lighting had been turned off so I had to use a high ISO.  I also used tungsten balanced WB to keep things as white as possible.

I/50 sec ISO1600 handheld
This shot was split toned (red/green) in Photoshop. There was already a significant difference between the foreground and the background so I used the split tone to accentuate this.  The red table and chairs were lit by a bright red outdoor heater.

I/30 sec ISO400 handheld
  For this shot I wanted to keep a large area of darkness.  The metering on the camera always wanted to brighten the whole scene up so I used exposure compensation.  I originally took this in black and white but I like the colour as much; the darkness leading into the light and the stairs taking the viewer up to the restaurant sign.

I/45 sec ISO800 handheld
One issue with night lighting is flare but in the right place it can be very effective.  In this shot the flare from the streetlamps makes them look like a pair of drop earings.  Again there is a lot of black in this picture but this was necessary to stop the clock face from blowing out.  I could have increased the dynamic range or used photoshop to bring out the rest of the picture but I prefer the mood the darkness creates.

I/45 sec ISO200 handheld
These next two shots are long exposures taken from a motorway bridge.  I took a range of shots from different positions and at different shutter speeds.  Over 10 seconds gave continuous streaks of light but it's dependant on the speed of the traffic.  Motorways are obvious choices for this kind of shot but I think city centre night shots are far more interesting.

13 secs ISO200 tripod

I0 secs ISO200 tripod
The following two shots show the difference between a one sec and a 10 sec exposure taken from a moving car.  I tripod mounted the camera on the passenger seat and used a cable release to take the shots.  The dashboard was never going to stay sharp with the long exposures but I wanted it in the shot as it gives more of an idea of the exposure and lets the viewer know that it is the camera that is moving.  The ten second shot was taken on the motorway.  I enjoyed creating these shots as there was an unexpected element.  I stopped every now and then to check what I'd got and adjust the camera settings.  I got a lot of interesting shots of which these are only two.  Driving past a zebra crossing is interesting; have you noticed that the poles on belisha beacons light up these days?
  
I sec ISO200 tripod

I0 sec ISO200 tripod
These final two shots were taken under the floodlit conditions of the greyhound stadium.  Despite being bright, I still used a higher ISO because of the focal length of both shots.  The first shot was taken across the track and the second was taken from the grandstand through glass.  There are no refections because they dim the lights when a race is underway.
  
I/80 sec ISO800 handheld

I/100 sec ISO800 handheld
Learning points:
Night photography is very wide ranging with quite different techniques needed for different shots; moving and static subjects, dim or brightly lit and different colour temperatures.
When it came to white balance I would quite often use what I prefered for mood rather than accuracy.  The photographer creates the image and this is just another weapon in the photographers arsenal.  Daylight balance was invariably too warm but there are a wealth of different types of artificial lighting these days and more and more of them have a more natural balance.  The AWB on my new camera is far more accurate than on my old camera and I found that I could rely on it far more.
Cameras are far better at dealing with high ISOs these days and I found I could shoot most scenes handheld unless deliberate streaks were the desired outcome.  If noise becomes an issue then shooting in B&W and presenting it as grain is also an option.

No comments:

Post a Comment