Friday 25 February 2011

Elements of Design: Project - Rhythm and Pattern

Exercise: Rhythm and Pattern

Aim:  The aim of this exercise is to produce two photographs; one conveying rhythm and one conveying pattern.

Approach and results.  For 'pattern' I wanted to show the repetition of a particular shape.  I chose the tiled rooftop of the holiday home we were staying in at the time.  I filled the frame with the tiles, making the pattern borderless and endless to the eye.  I chose to use black and white to enhance the pattern by taking away any colour variation (not that there was much).  I also tried to crop the image as symetrically as I could to make the pattern look as even as possible and waited until the light was at an angle to bring out the pattern.


Pattern
For 'rhythm' I chose this line of pegs across a balcony in the town we were staying.  I wanted the progression across the frame to be more than just a line.  The pegs move from top to bottom and from orange to brown to blue.  They remind me of notes moving across a page of music.  The brown merges with the background leaving an orange/blue compenentary colour combination.
 
Rhythm
 Learning points:
It is important to fill the frame with a pattern so that the pattern continues on in the viewers head.
For rhythm it is important to capture some progression and not just repetition.  It is not just shapes that can create the rhythm but also colour.

Wednesday 23 February 2011

Elements of design: Project - shapes

Exercise: Real and implied triangles.

Aim:  The aim of this exercise is to create two sets of images; the first 'real' triangles and the second 'implied' triangles.

Approach and results:

This first set of 3 images are of real triangles i.e. they have real edges that form a triangle.  This first image is an actual triangle.  The frames of the windows in this building are triangular creating an increasingly large triangle as you include more windows.

F13  1/125 sec  ISO200

This second image is a triangle by perspective.  The railway track is straight but the angle of the camera creates the triangle.  There is direction and movement as the track dissappears into the distant tunnel.  This is also backed up by the viewers knowledge that a railway track suggests travel and direction.

F5  1/25 sec  ISO200
This third image is also a triangle by perspective as the beams on the roof converge in the distance with the cross beams forming a series of traingles.  There are other considerations in this image; the pillars and lights make this image less 'clean' than the previous one.  The previous image is simpler and the traingle more obvious and stronger.

F6.3  1/80 sec  ISO800
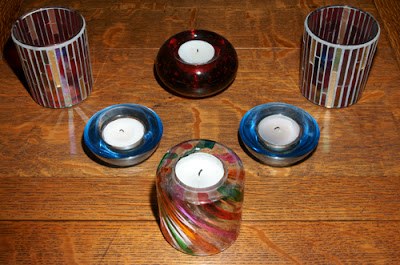
 This second set of images is of implied triangles i.e. traingles that are made by the eye.  The first two are quite obvious triangular still lifes using similarly sized tea light holders.  The diference being the second image is an inverted traingle.  They both create very structured still lifes but in this case I think that the inverted triangle is more effective as it places a single object at the front of the image creating a hierarchy or order in which to view the image.

F20  1/60 sec  ISO200

F20  1/60 sec  ISO200

This third image is of a wine tasting event.  The vinyard owner with his animated explanation and gestures, the customer taking in the bouquet and the restaurant owner listening intently behind.  There is a structure and order to the image that tells the story of the event.

F4.5  1/15 sec  ISO800
Learning points:

Real and implied triangles can be used in images to create structure and direction.  They create order within the image and also an order in which to view the image.

Tuesday 22 February 2011

Elements of design: Project - Using lines in composition

Exercise: Implied lines

Aim:  The aim of this exercise is to identify and create implied lines in images.

The first part of this exercise is to identify the implied lines in the following two images.  I found the second image more obvious than the first.  There is an obvious eye line from the horses to the trainer.  In the first image I think the line is that of the direction of the bull moving through the bull fighters cape.  As you cannot see the faces of either the bull or the bull fighter you cannot identify any eye line even though there will be one.  The clearest and strongest line is that of motion of the bull and cape. 


The second part of this exercise is to identify implied lines in three of my own images.  This first image is of the roof of a motor museum.  A line of vintage motorcycles had been mounted on the roof, all pointing in the same direction creating an implied line.  There is also the real line of the roof but this is overshadowed in this image by the motorcycles.


In this second image there is an eye-line that extends along the line of the glass from left to right.


In this third image there is direction and movement and an implied line from left to right following the subject as they travel along the zip line.


The third part of this exercise is to plan and take two images that use the following implied lines;
  • an eye-line
  • the extention of a line, or lines that point.
This first image was taken in the props room of a local theatre.  the two faces on sticks were stacked in a packing case with a number of other props and they were staring at each other.  A minor bit of rearranging took place to give me this shot.  There is still a lot going on in this image but the strength of the implied line created by the eye-line immediately focuses the viewer to the point where it is difficult to look at anything else. 


In this second image I wanted to create the extension of a line.  The implied line runs from the stalk, down the leaf pointing to the conker making the leaf look like a hand stretching out to grab the conker.


Learning points:

Implied lines in an image give it context and a sense of deliberate purpose.  These images are much stronger for this reason.

There are many ways to include implied lines in an image.

Tuesday 15 February 2011

Elements of design: Project - lines

Exercise: curves

Aim:  The aim of this exercise is to take four photographs using curves to emphasise movement or direction.

Approach and results:  Again for this exercise I wanted to use four different subjects.  This first image is of a restored arcade with ornate railings running around the floors.  The strong curves in the railings lead the eye into the image and the eye follows them like a they were a continuous ribbon running round the floors.

F7.1  1/13 sec  ISO400

This second image shows a line of curved paving stones.  This is reinforced by the objects deliberately placed along its length, creating a curve of their own.  I have captured the full curve from corner to corner so that it leads the eye through the picture.  Taking the picture at a different angle could produce a different result, for example, emphasising the straight line of stones that currently plays little or no part in the image.

F13  1/320 sec  ISO400

The third image is of a 60's office building that has a continually curving, wavelike front.  The long curve is emphasised by the repeating pattern of floors, creating a series of curved stripes through the image.  This image was technically more difficult as I was aiming upwards, creating slight converging verticals.  Correcting this meant that the lamp posts started to bend outwards.  The way the curves work in the image meant that I could never get the picture aligned how I wanted.  I'm sure it is straight but can't see it! 

F13  1/80 sec  ISO400

The final image is of the shadow of a tennis net.  The net had been lowered whilst not in use creating a long curve with a number of repeating fine curves reinforcing it.  There are a number of actual white lines in this image but they default to the shadow of the net and only act as an aid to identify the subject as a tennis court.  I viewed this image in black and white thinking that the shadow would stand out more.  Interestingly, using a black and white image makes the straight white lines far more competitive.

F13  1/125 sec  ISO200


Learning points:

The key learning point is creating a curve that is strong enough to lead in the image otherwise the direction or movement that you wish to create is not apparent.

Monday 7 February 2011

Elements of design: Project - lines

Exercise: diagonals

Aim:  The aim of this exercise is to follow on the exercise on horizontal and vertical lines with 4 examples of strong diagonals.

Approach and results:

For this exercise I wanted to find a mix of diagonals.  The examples are all man made but quite different.  This first image is of the inside of an old arcade.  The elaborate railings provide strong diagonals from all corners, converging near the middle.  They provide a sense of direction, movement and focus for the image.

F3.5  1/13 sec  ISO 200

The second image is taken vertically inside the cladding of a modern office block.  The diagonals are created by virtue of the height of the building.  I used black and white for this image as there were only hints of colour that added nothing other than distraction from the subject. 

F5.6  1/40 sec  ISO 100

This third example is of an aqueduct and differs from the previous two in that the diagonals do not come from the 4 corners and converge towards the top of the image in a distant vanishing point.

F10  1/160 sec  ISO 100

In this fourth image I have created the diagonals by virtue of the camera angle.  Holding the camera at an angle can lengthen subjects in the frame and can look far less static than a conventional horizontal or vertical image.

F14  1/80 sec  ISO 200

Learning points:

Diagonals create a strong sense of movement and drama in an image.  This is the case whether they converge within the frame or cross it.

Saturday 5 February 2011

Elements of design: Project - lines

Exercise: Horizontal and vertical lines

Aim:  The aim of this exercise is to capture 8 images that contain horizontal and vertical elements (4 horizontal and 4 vertical).  These elements should be the focus of the image (what the viewer would notice first) and any other content should be subordinate to these elements.  This exercise focuses on actual lines rather than implied. 

Approach and results:

I wanted to find a good range of subjects for this exercise.  In general I'm drawn to strong lines and repeating patterns to the point where they become abstract but I wanted to capture single lines as well.

Horizontal:

In this first image there are a number of continuous horizontal lines; the reflection, the stones, the path, the top of the bank and the trees.  These all reinforce the sense of 'horizontal'.

F10  1/40 sec  ISO 200

In this shot the railings create a strong and bold horizontal line.  The top and bottom of the railings are continuous and there is a tight repetitive pattern on the railings acting as a continuous line.  This is also reinforced by capturing 2 sets of railings.

F5  1/40 sec  ISO 200

This image of the viaduct is an example of a single horizontal line.  The train, dark brick and red brick act as one.  The line of arches with their dark shadows also give an implied line which I think is stronger.  There are competing subjects here in the tree in the foreground and the tower blocks behind but I think the line of arches remains the main subject overall.

F9  1/320 sec  ISO 200

This image is of a flight of steps with bright yellow edges.  I used the hand rails to add to the symmetry of the image and to identify the steps as steps and not lines on a wall.  The yellow lines are dominant but you could also look at it as a series of grey lines.

F14  1/10 sec  ISO 200

For this image of tower cranes I chose to shoot into the sun, shielding it partially with the crane.  This gives a strong vertical silhouette against the sky which benefits from being black and white.

F13  1/640 sec  ISO 200

This image is of a cylindrical sculpture with gradually changing coloured stripes.  The reflection of the sculpture in the building shows how the colours change but is not immediately recognisable as its reflection.  It is difficult to resolve the lines as they do not create any depth nor do they resemble something familiar.  This creates a tension in the image and I find myself drawn to the lines in an attempt to understand what they are.

F8  1/320 sec  ISO 200

For this image I zoomed in on a line of plain trees.  This works better as than if the trees were in bloom as the trunks would not be visible and it is these that give the vertical image.  The smaller branches all growing upward help to reinforce the vertical theme.

F8  1/200 sec  ISO 200

In this image of record sleeves I have captured many repeating verticals.  On reflection this would have been better taken in portrait as this would have increased the 'verticalness' of the image; longer lines but fewer of them.  I was, however, careful not to include the shelf as this would have given the option to view this as horizontal

F10  0.8 sec  ISO 800


Learning points:

Capturing the eye with repeating vertical or horizontal lines is far easier than using a single line where the content needs to subordinate to the line.  Repeating lines not only take up more of the frame but reinforce the image.

In particular the horizontal is more difficult as it has to be more dramatic than the vertical to stand out.  It is more difficult to be in a position to capture or appreciate a horizontal line even if it exists.  Getting a viewpoint for a vertical line such as a tall building is far easier.  You also need to be on the same plain for either to avoid diagonals or converging lines.